Raw Files
You can't do squatFact checker:
1/ A raw file is not a photograph.
2/ You cannot change a raw file.
3/ Ipso facto, applying a colour balance setting in camera does nothing to a raw file.
4/ Every single digital camera on the planet creates a raw file, but most will be discarded by the device immediately after use.
What that means:
Nothing you do in camera, or on your computer, will change a raw file, including colour balance settings and choosing a colour profile.
Let's look at this a little closer.
A while back, and it will happen again no doubt, the interwebs were abuzz with the revolutionary "new" discovery that you needed to apply a colour balance setting to stop a colour channel "blowing out" in your raw files in extreme lighting conditions (sunrise, sunset, deep shade on clear day, etc).
This is total crappa (latin for "chaff, discarded waste", you can google it) and is proof positive that no one seems to understand exactly what a raw file is and how it's used.
Once again, the desperate need for "influencers" to provide content floods the internet with, well, you know, that latin stuff.
Merriam Webster Dictionary - "crappa", medieval Latin: chaff, residue
Without getting too technical, a raw file is simply a record of information supplied by a camera's sensor. Light striking the sensor is converted into an electrical signal, which the camera's software captures and records at the moment of exposure, similar to recording someone's voice with a microphone and storing it as a sound file.
The camera writes the raw data to your memory card in a manner unique to each camera manufacturers software setup, saving it in a raster-like format. So, it's not a photo.
In addition, data from the camera is added to the raw file in the form of metadata; information about camera settings at the time of exposure, and much more.
That does not change the raw information recorded from the sensor. It's additional data added to the file, alongside the raw data, which helps both the camera and raw conversion software to display an image close to what you would expect.
As noted in point 1 above, the raw file is NOT a photograph, and never will be. It's a bunch of data captured from a device that makes electrical signals. That's why a raw file ALWAYS has to be converted into a photograph, even on subsequent occasions when the raw file is opened again.
Regarding not being able to change raw files in point 2, this may appear to be incorrect, as colour balance set in camera or adjustments made during the last opening of the file appear to have changed the raw data.
However, those adjustments don't change the original file, but are recorded in a separate file, called a sidecar file, with a different extension (usually .xmp) and kept with the raw original or, in the case of colour balance, are obtained from the extra data added to the raw file on creation.
Further, how your raw file looks in the conversion window is mostly due to preferences and settings in the conversion software, such as the Camera Raw window in Photoshop, not the original raw file.
Colour balance set "in camera" is added to the original raw file, just like metadata, but DOES NOT change the raw data, it's just recorded alongside the raw information and later used to interpret the image in the raw conversion window or your camera's LCD screen (and viewfinder, if you use a mirrorless camera).
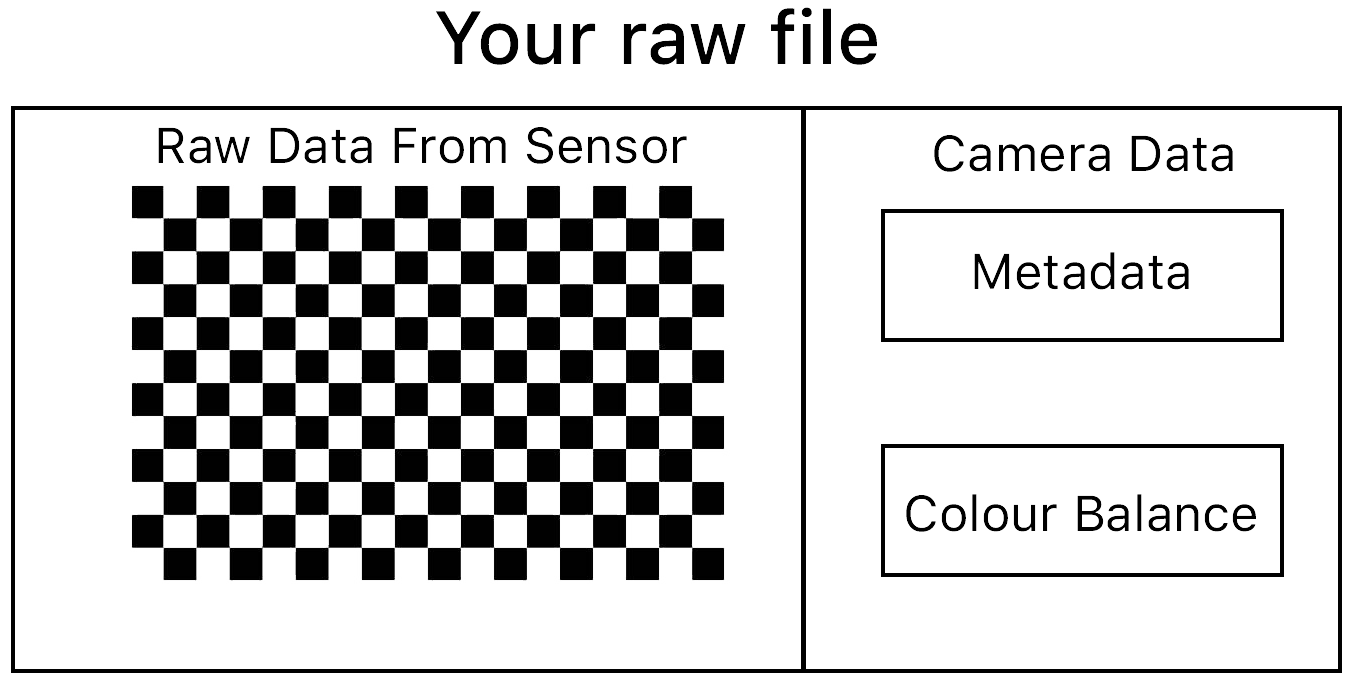
Simplistic illustration of a raw file's contents
If colour balance was used in the process of writing the raw file, it would no longer be raw. It would be raw minus some colour information or raw with additional interpolated colour information.
You can see how this works in the Photoshop Camera Raw window. Open a raw file and look at the White Balance dropdown in the Basic menu. This will probably be set to "As Shot". This interprets the raw file data using the colour balance settings your camera saved alongside the raw data.
It's literally the same as shooting film but viewing the slide through a colour balance filter. The original slide is still the same, it just looks different due to the filter.
Now, change the dropdown to Auto or Cloudy or any other setting you could have used. If you used a custom colour balance setting (degrees Kelvin in your camera balance settings), that will be used in the As Shot setting, like any of the other presets, such as Cloudy or Open Shade, that you may have chosen.
All of the dropdown options will provide the same interpretation as if you had set it in camera. See, the raw data was never changed, you just had a "filter" applied.
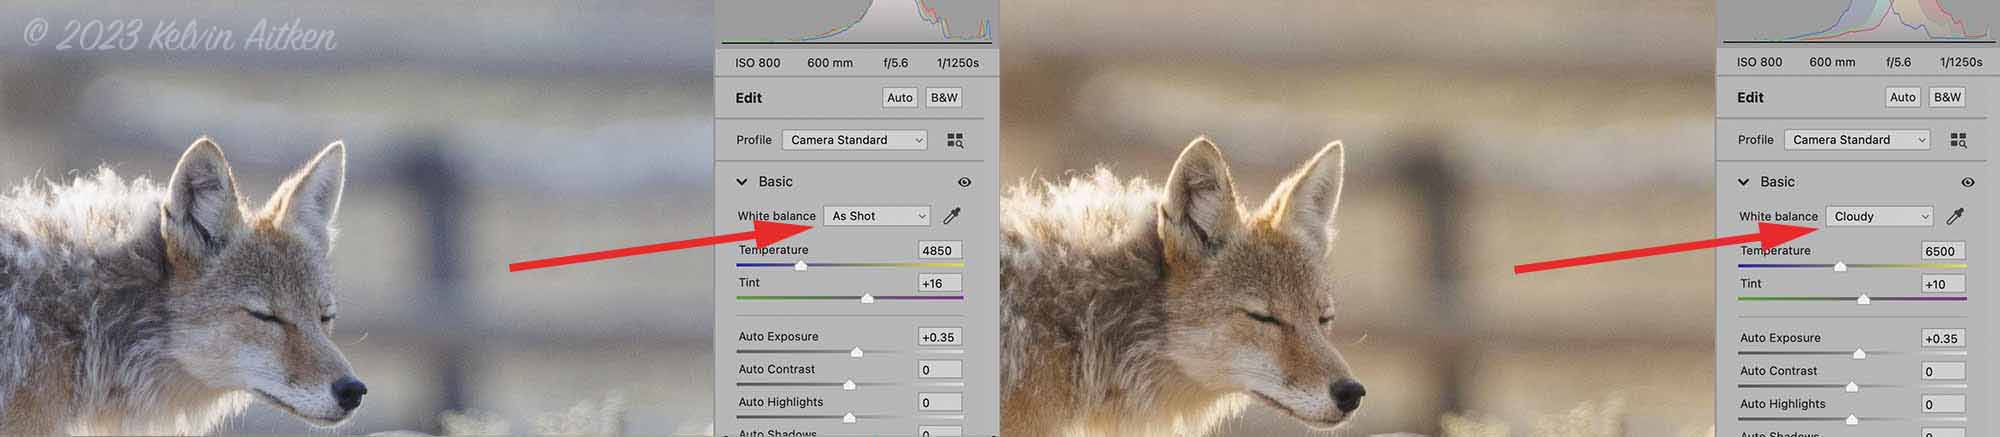
Changing the colour balance dropdown shows that the raw file is still raw
Therefore, setting a custom colour balance, or one of the colour presets provided by your camera's software, does NOTHING to the original raw data.
"But", you may say, "with a new colour profile selected or set, I can see the raw file has changed on my camera's LCD screen".
Sorry, but no banana. What you are looking at on your LCD is a converted jpg using your colour settings, not the raw file.
The camera creates a jpg for viewing on the LCD and/or the viewfinder (if you are using a mirrorless camera) from the raw file. In doing so, it uses your camera preferences and settings, including colour balance.
This is why often the LCD may show highlights as clipped (blinking or flashing if you have set that up in your camera's software settings) when in reality the raw file has information there, which can be recovered in the conversion process, while the compressed, 8 bit jpg has dumped that data.
In addition to all that, you most probably have never seen the real raw information contained in a raw file. You see an interpretation based on the camera manufacturers software settings along with whatever settings are in your raw conversion software.
A perfect example of that are images from very wide or very long lenses. Vignetting and distortion are quietly reduced, often beautifully, to provide a version that won't make you spit coffee at your computer screen. Some conversion software allows you to sneak into the background shinnanigans and turn off those adjustments, allowing you to see a version much closer to, but not exactly the same as, the "real" raw file data. Gaaaaah!! My eyes are burning!!!! it's probably best to leave those alone.
If you use a phone, tablet or low end amateur camera, you probably don't have the option to open an image from the raw data, as those devices only use jpg files (or similar compressed formats), discarding the raw information immediately after processing.
This is understandable as usually those users will never want to grapple with converting raw files. They just want their selfie, post it to social media and 3 seconds later it's scrolled and forgotten.
Is there any advantage of changing the colour balance in camera?
Technically, no, but there are still advantages.
I'll give you an example.
Back in the bad old days, if you had to shoot colour negative film (or if you're a hipster landscape photographer like @heatonthomas, who has the world's best leopard shot) without filters under tungsten light, or (horror) those orange industrial lamps found in a warehouse, you could filter out the green (fluorescent) or orange (mercury vapour) in the darkroom.
You would notice on the enlarger's focusing easel that the colour balance shifted towards normal as you increased the opposite filter colour. But when you had something close to "normal" your negative, projected onto the easel, now looked woefully underexposed, "thin" with little density in the highlights and empty shadow areas.
Yes, most of the "data" in the negative was unusable light that had now been removed by the filter. The solution was to over expose by a stop or three, in camera, or apply a filter on the camera lens, which in turn meant adding in that stop or three during the exposure anyway.
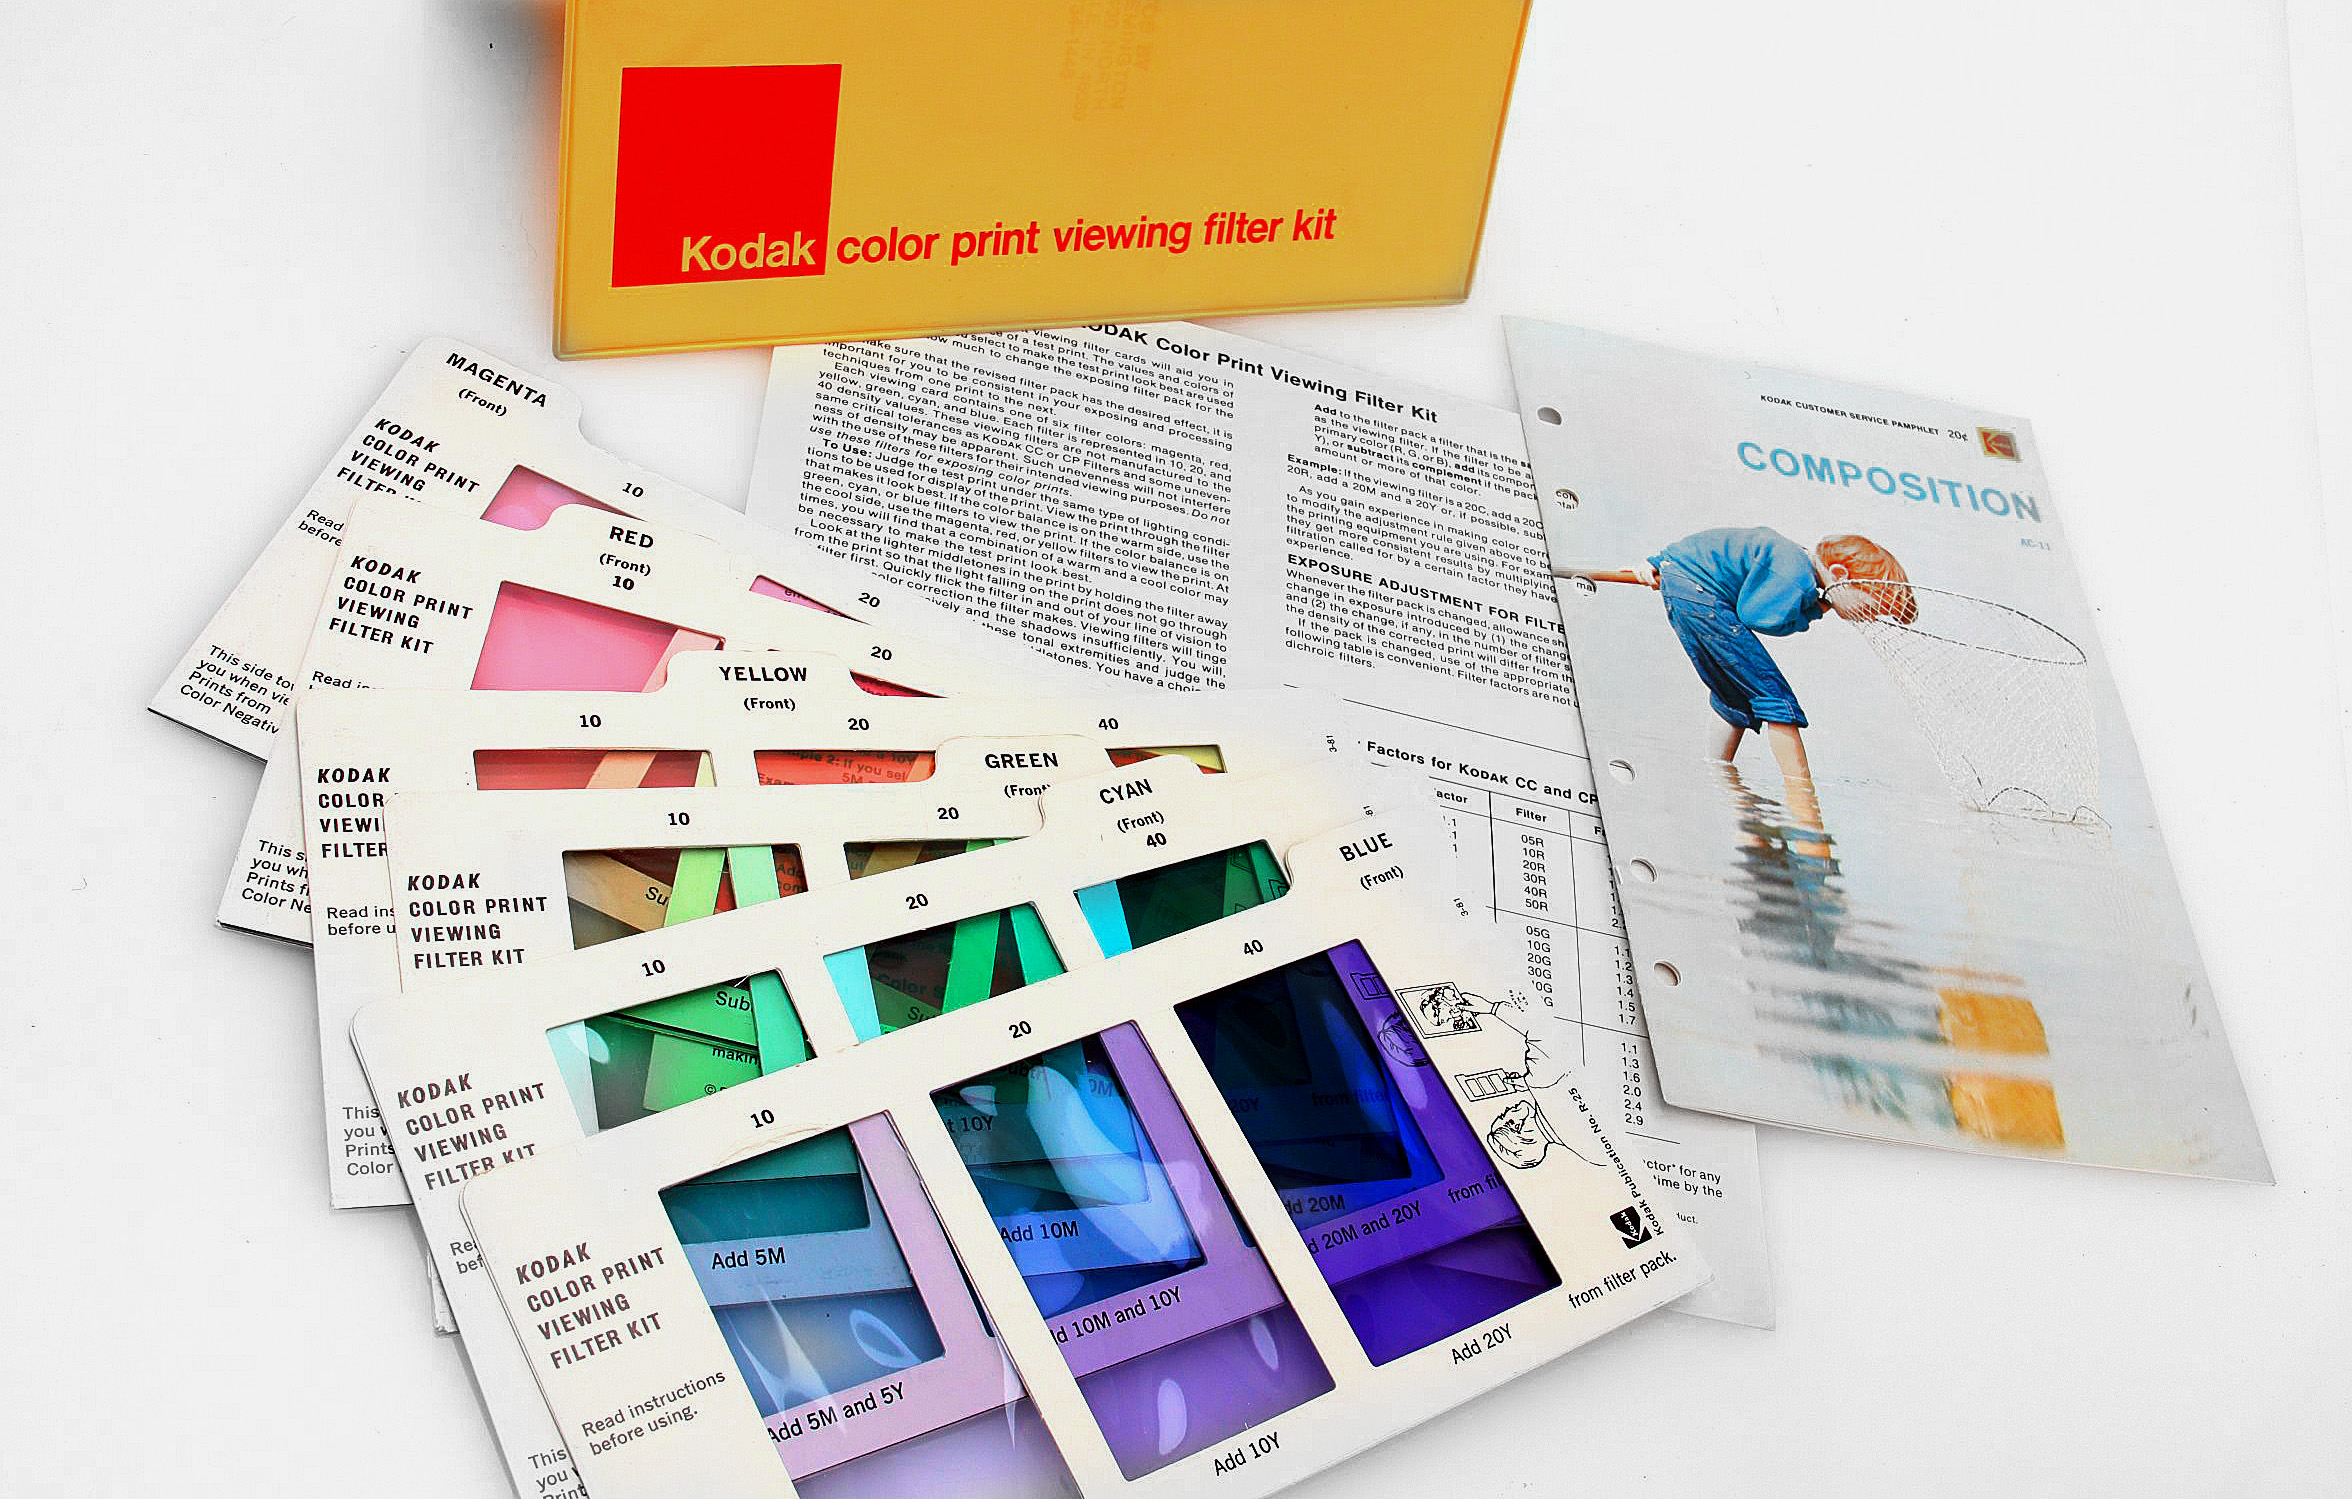
Kodak print viewing filters, used to determine approximate CC adjustments in colour prints & transparencies
The end result was the same, minus the optical degradation that a heavy filter may have added on the camera lens or putting up with the exceptionally long exposure times in the darkroom if using an overexposed negative with dense correction filters (neither being a factor in the wonderful world of digital photography).
Take the example of photographing in the shade on a blue sky day.
Your image is heavily biased in the blue channel. To get the photo back to normal, you'll need to take some drastic action with the blue/yellow slider in the Camera Raw conversion window. If you have your camera's colour balance set to "Open Shade", or similar, you're throwing in a filter bias, pre-setting, if you will, the blue/yellow slider in your raw conversion software, moving it into the yellow zone.
In practical terms, that means you will need to take less drastic colour adjustments in the raw window as that's already been done in camera. Not really a big deal in practical terms, it's just moving a slider.
But, by applying a "warming filter", aka colour balance setting, you're reducing the amount of blue light showing up in your LCD image and histogram or conversion software. But remember, you're not changing the actual raw data.
Up to that point, before we added a warmer colour setting, we've been trying to avoid clipping the blue, reducing our exposure to stop the blue channel hitting the right hand side of the histogram.
That results in the other two channels (red & green) being much further from the right side of the histogram, compared to where they would be without the heavy colour cast. In practical terms, we're underexposing 2/3 of our image, the red & green channels because we're trying not to clip the blue channel. We don't want that as underexposure=more noise.
When the warmer colour balance is applied in camera, the three channels are now much closer in alignment, with the dominant colour (blue) now moved left away from the right side of the histogram.
Now we see that our image could do with some brightening up as the blue channel has retreated from the right hand side of the histogram, moving left to align closer with the red and green channels. You can now move all 3 channels further right by increasing your overall exposure. We want that as brighter exposure values=less noise.
In real terms, under the hood as it were, you're really clipping the blue channel by providing a bias against blue and moving the other two channels up as (let's all chant this together), "You can't change raw data".
Again, you have'nt changed anything in the raw data, you're just applying a filter, reducing the influence of the blue channel IN THE HISTOGRAM.
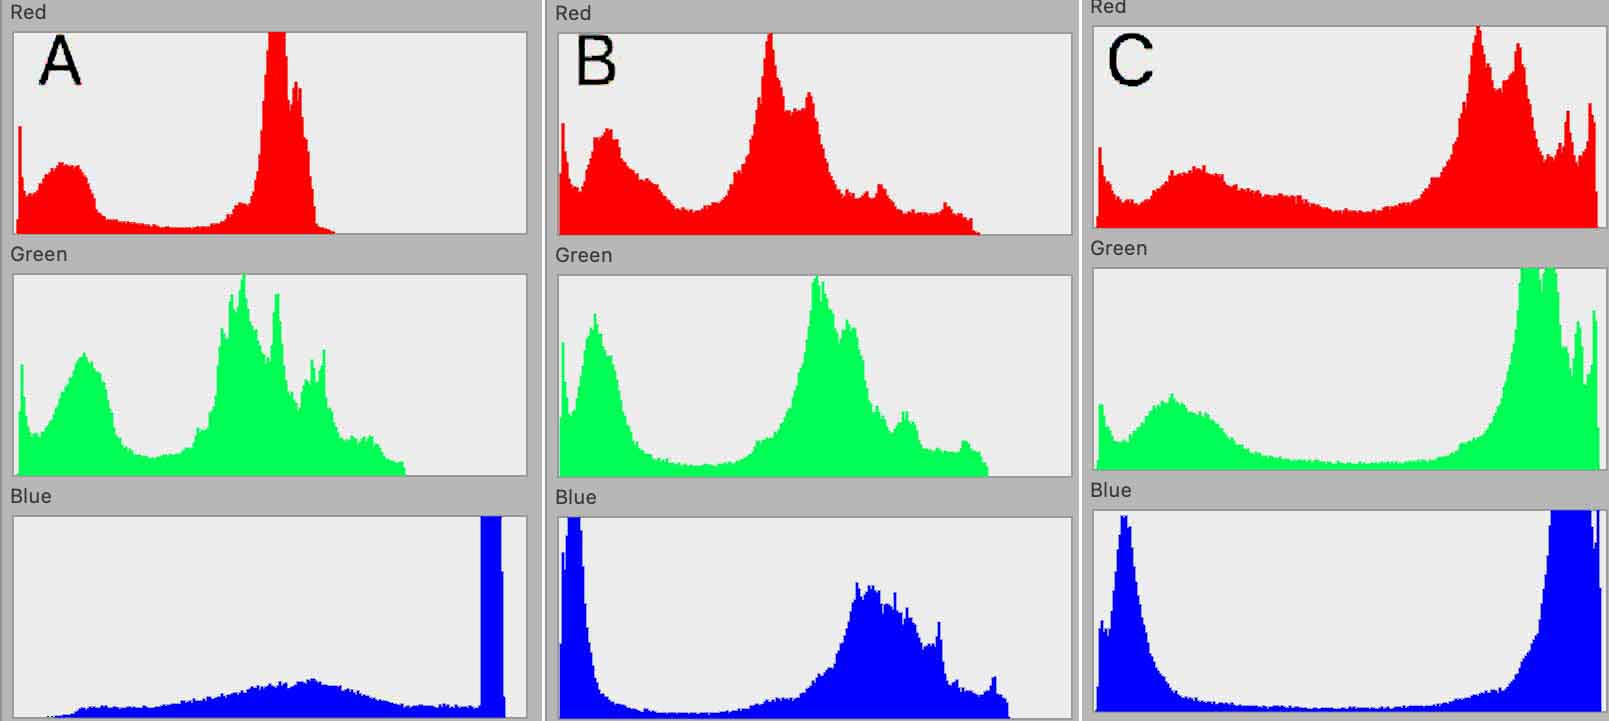
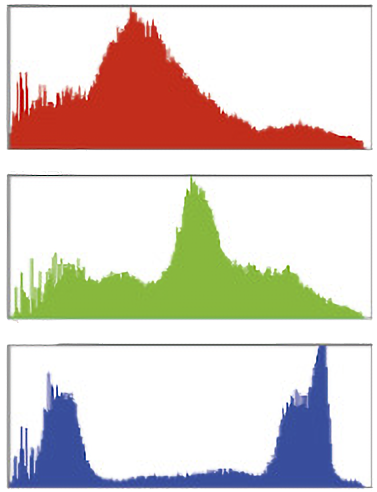
(A) Blue cast. Blue exposed correctly, red & green underexposed
(B) "In Shade" colour balance setting applied, correcting cast by moving blue channel left
(C) Colour balanced with increased exposure=correctly exposed & less noise
Overall, your image will look better as the red and green channels have more exposure, more meat as it were. It's similar to putting a yellow filter over your lens. Less blue light is getting through, you expose more to compensate resulting in a much better result.
You have, visually, less blue data (which in reality is actually clipped or, at the least, squished raw blue data), but much more red and green data. The overall result is more data in the highlights, therefore a better looking result.
So, yeah, you either deliberately clip the blue by increasing exposure or pretend you aren't clipping the blue (which you obviously are) by applying a "filter" to the output on your LCD screen and then increasing exposure to move the histogram to the right.
Makes you cringe, if you're a technical perfectionist.
On the plus side, this should help you understand the technical wonder of modern day raw files. You can do stuff like that and still get a decent result. If you were shooting with a much older 1990's digital camera, your files would fall apart. You had to use film/filter techniques in extreme conditions (i.e. inside a warehouse or in open shade) to get a useable result AND use 100-200 ISO.
In summation:
A raw file is not a photograph but is a bunch of data received from the camera's sensor. It can't be changed, it's always raw data, but it can be converted into a photograph.
Camera colour settings are recorded alongside the raw data as well as metadata, but does not change the original raw data. It's just another setting that can be applied, or ignored or changed.
To get the very best out of your camera, save your raw file.
Just to be clear, because a raw file is a record of ALL of the information from the sensor, you can't take a jpg and make a raw file, at least one that has all the information of the original raw data. The jpg format dumps at least 50% of the raw data when created, so translating that into a raw raster file can't get back that deleted data.
Most cameras will allow you to save a copy in jpg format, as well as the raw, which can be handy in some instances, but can soak up extra storage space. I never bother as out of hundreds or thousands of ecposures I probably only convert and keep two or three images. Making a jpg for email or web use is pretty easy during the conversion process.
All phones and tablets, along with some cameras, discard the raw data immediately after creating an image file. I doubt that will ever change but you can find a third party app to catch and save the raw data at the moment of exposure.
Some professionals don't bother saving raw files as the end use is low end, low resolution display, such as in news streams or online & printed magazines. Sports photography is one example, where time spent downloading and converting raw files is too time consuming. Images can be selected in camera and sent to the client via wifi and cell networks within minutes, or even seconds, of the exposure.
To get the best out of your sensor, expose over the "normal" setting, moving the histogram on your LCD as far to the right as possible without clipping. In snow or other high key situations, that may show up as slight clipping with "blinkies" in some areas on your LCD.
A final suggestion: when you set your LCD options to show a histogram, if your software allows it, have it displayed in the three channels (red, green, blue) and not as one combined lump. It will help you to see exactly what's happening with your exposure in each channel.