
Extreme Cold #2
Gear That Keeps You AliveThe following information is for extreme cold, not just cold or cool weather. Dial it back for less intense cold if you wish, but otherwise these are bare minimums based on practical experience over a number of years.
Most of you have no intention of ever shooting in -30, -40, -50 or colder. The few that do will most probably be housed in some sort of luxury accommodation, or a hotel at the least.
As such, all they need to do is to be operational for a few hours out in the open, then retreat back to a heated lodge with a chef, wifi, queen sized beds and most of the mod cons.
After a day out in the frigid cold they will be opening an insulated door with a wall of heat greeting them, lights burning, the smell of food cooking and the chatter of happy people enjoying a pre dinner drink, the experience of being in -40 for a few hours rapidly fading in the glow of a luxury lodge.
Their face tingles in the warm air, boots are kicked off with numb toes flexing on the soft carpet, fingers burning a little as warm blood surges back to the peripheries, a heavy thick jacket shrugged off to be hung up above the frozen boots.
However, for an extremely small number of people, that won't be the case. They will not only go out in that sort of extreme cold, but will also camp out there, hike, follow animal tracks, scope the distant slopes, set up a hide, sit for hours, hike back to camp, heat food and make water for the next day.
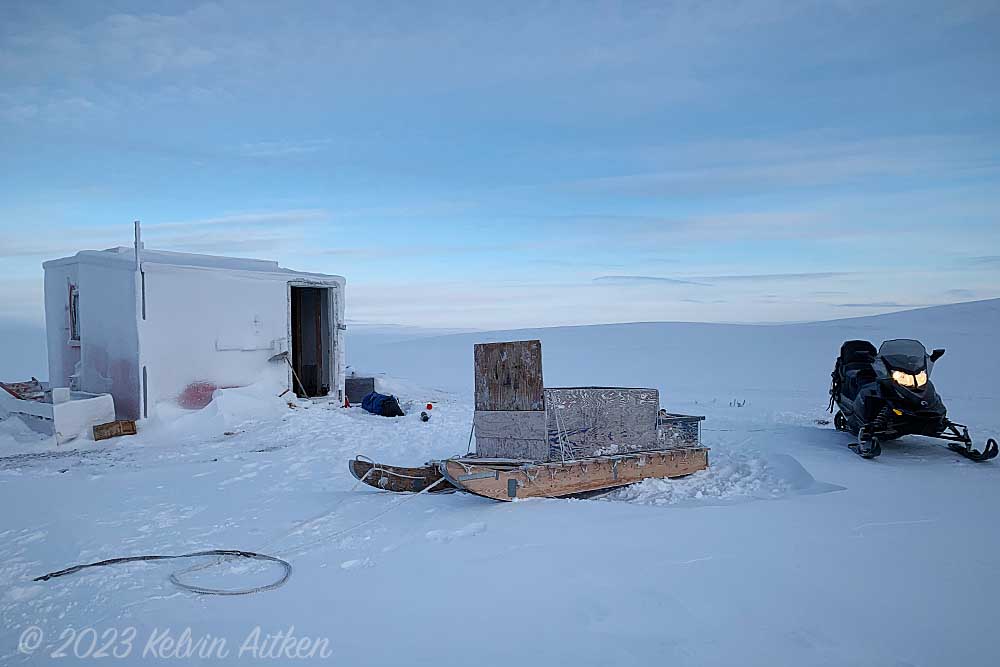
Luxury hotel in -45C with full amenities
They will greeted by a frozen camp, frost on the tent, a cold stove and dry food packets.
There will be no heater, no warm air, no luxurious bed with heat wafting up from the floor vents. There will be little time, and even less energy, to build a roaring fire. The only heat will be from the flicker of a liquid fuel stove.
They will crawl into their sleeping bag impatient for warmth to arrive, nose jutting out into the brittle air, frost starting to gather on the roof.
There will be no respite.
Waking will bring no joy. The thought of unzipping that warm bag to hurriedly shrug on stiff cold clothing is mental torture. Doing it is worse. It will take time for the boots, gloves and clothes to begin to warm up. All the while your bladder's about to burst, because your body has been removing excess fluid during the cold night, and the horror of taking a dump in a brisk breeze with a -50 chill factor is looming over you.
But there's still that small subset of crazy people who do that. And love it.

Dangerously cold, horribly uncomfortable. I want this.
To be truthful, there's not a whole lot of difference between between the two groups, and again not a whole lot different from someone who skips winter and starts to go out again in spring time. How so?
You still have to keep warm during the day, keep your cameras operating, stay safe and stay hydrated. You just skip the "sleeping in the cold" part.
In order to stay safe in extreme cold, you simply have to keep warm. That includes clothing, hydration, calories, and perspiration control. Let's start at the bottom and work up.
Feet
Obviously, serious winter boots are a must. No compromise will do. There are hundreds of snow boot variations out there. The important thing is to get some with removable liners. That will allow you to dry them out overnight and/or replace them with a dry set each morning.
You should buy a pair that are at least 1 size too big, 2 sizes is better. You need lots of space in them to allow wearing two or three pairs of thick socks. You need a large amount of space for air to move around. If the boots are too tight your feet will never be warm, no matter how many pairs of socks you use.
NOTE: When shopping for boots, don't get sucked in with the "rated to -70C" marketing garbage. For a start, at -70 cold feet will be the least of your problems. The effectiveness of your footwear will depend on how you manage your socks and boot fit.
You also need a bit of room for toe warmers or foot warmers.
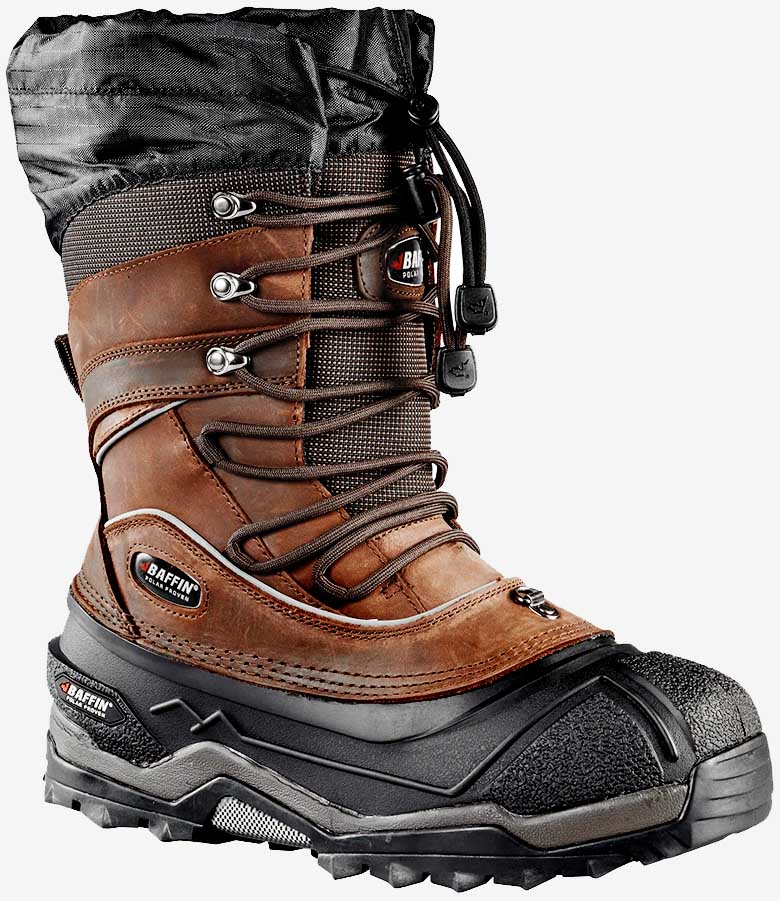
Your basic snow boot
When it comes to feet, you need to plan for the worst possible environment; in other words, sitting still in a hide for 8 hours with snow or ice under your feet.
If most of your day is spent moving about, in other words, hiking, then you can get away with less boot room and fewer inner layers. But it's best to plan for extremes.
On the subject of foot warmers, don't rely on them. If it's cold enough you may never feel any benefit. It's not because they don't work, as they do, but they have little effect in the real world when it's -40. They do add warmth, but not enough to overwhelm the constant onslaught of heat sucking cold. Most people expect to feel a wonderful radiating heat, which they do if it's not really cold (i.e. 0C), but you won't get that in our situation.
"What about heated/electric socks?" They work.....for a while. They're expensive, fiddly, need recharging after a couple of hours, tend to break or get other faults that stop them from being reliable. In extreme cold, if something has a weak point it will break. I don't use them. They are often used to keep feet warm in boots that aren't up to the task. Buying high quality snow boots is a higher priority than an unreliable gimmick.
If you are hiking decent distances then sitting for long periods, you'll generate a lot of water in your boots from foot perspiration (which I will refer to as "sweat" from now on). Some people produce more than others. To keep the boot liner dryer (so it doesn't freeze solid overnight) you can put your socked feet into a used plastic bread bag, then put on your boots. That will provide a moisture barrier inside your boots, keeping your sweat inside your socks while keeping your liners dry.
When you get back to camp and are preparing for your night, take off all your socks, dry your feet thoroughly and put on dry socks. That will ensure that you don't get cold feet overnight. Even the smallest amount of dampness in your socks will give you a miserable night. I know. I've been there.
Put the used socks alongside your body in your sleeping bag along with your boot liners. That will dry them overnight.
Buy yourself some down-filled booties for use around camp. They're very light, they compress down into a small space, are soft and, oh boy, luxuriously comfortable and wonderfully warm.
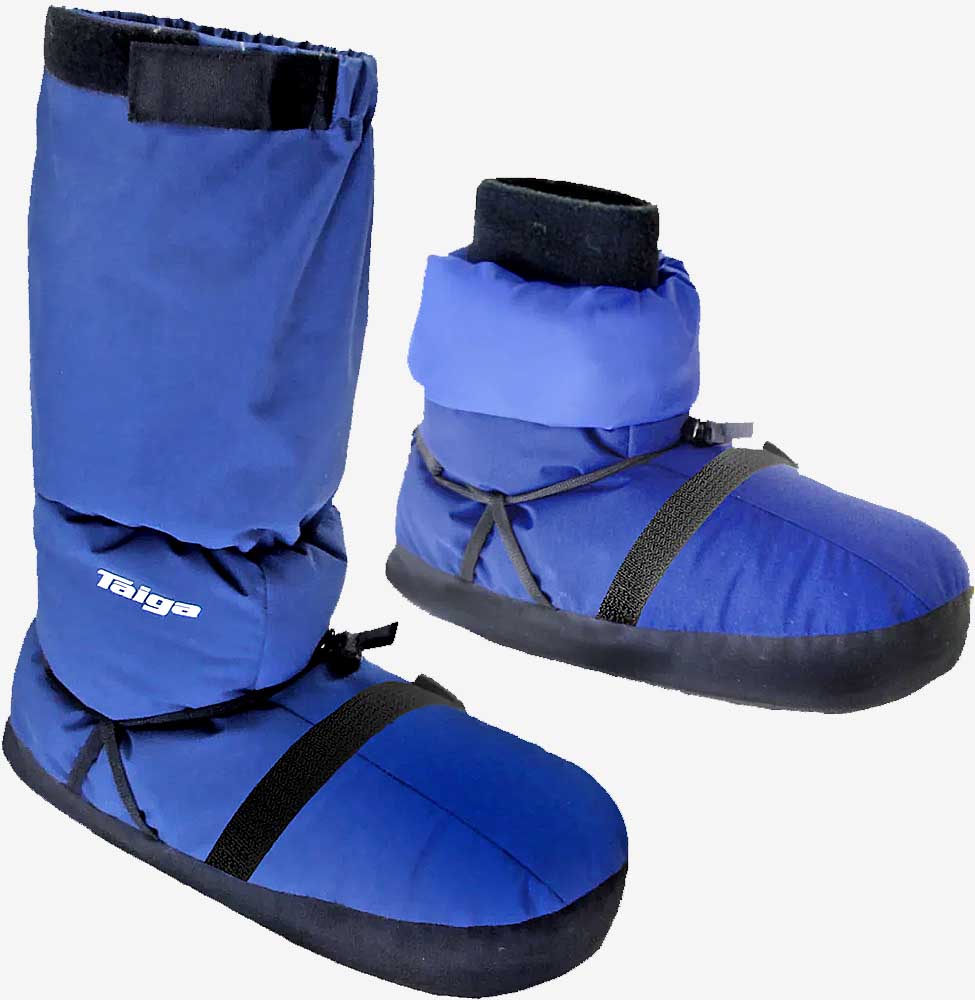
Tall or short, your choice for floofy comfort
You can buy the short ankle style (which I use) or those with knee high extensions (the down is mainly in the foot part) to allow you to walk in deep snow without any icy leaks around the ankle.
Again, don't get a tight fit. Loose is good.
They will be much easier to get on first thing in the morning as you flap around inside your tent. You can even put them on while inside your sleeping bag because they're soft and won't tear up the lining. You can switch over to boots later when you're ready to head out.
I haven't mentioned the best possible footwear for extreme cold, and that's traditional Inuit mukluks. Unless you know someone in the arctic that's willing to make them for you, mukluks are not readily available for purchase. There are commercially made mukluks but they're generally just "snow boots" and definitely not the same as those made by the Inuit.
Also, like any other "cold weather footwear", there are decorative, style-dominant mukluks intended for home or "around town" or tourist use and then there're mukluks intended for serious forays out onto the sea ice or inland for mid winter expeditions where -60 is a real possibility.
Legs
Like your feet, and the rest of your body, when it comes to legs, layers are king.
Start with full body thermal underwear. Two piece is best, in my opinion, and most common. You don't need fancy, pricey, trendy marino wool. You can if you wish but polyester is perfectly fine, cheaper and will last longer. Marino/poly blends are also fine.
For some weird reason you will find "influencers" talking about how much warmer marino wool is over polyester. This is because of a factor called, "getting a free set of marino underwear and selling out like a whimp", with no real practical difference between the two fibres when used in the field. Wool may feel warmer when held in the hand, espcially since polyester will feel colder to the touch if left sitting in cold air. But when worn, there is no measurable difference.
Thermals are only your first layer. They aren't there to "make you warm". That's you body's job. The purpose of thermals is to wick moisture away from your skin to make your body's heat production much more efficient and useable.
Get some that fit well but not too tight. You should be able to pinch them away from your skin without too much effort.
Old style thermals did not have that elastic quality that modern styles have, leaving large air pockets here and there, allowing sweat to gather on the skin. Ditch them for the more elastic, snug versions.
On top of that is your second layer. Remember, we're talking about extreme cold, so you're going to have multiple layers everywhere, from head to toe.
I suggest a pair of sweatpants or, as they say down under, "trackydaks". Get polyester for their warmth and moisture wicking. While cotton is a little more comfy, it holds moisture which will turn to ice when you stop moving about. That will have you in hypothermia quick smart. So avoid cotton clothing anywhere in your layer system.
You can add a second pair on top of that if you wish or add a pair of puffy polyester or down filled pants. That's your third layer. Adjust layers to suit your particular preferences. In my opinion, more is better than less as I spend so much more time sitting still than hiking.
If you're travelling on a snowmobile or towed sled, you will need the extra warmth.
Over all of that you add your snow pants which will be insulated with either down or polyester.
This is your outer layer so get something that's rugged and won't easily snag. You're going to be kneeling, lying in snow and grovelling about in general, so you want something with a decent outer skin that's tough and durable.
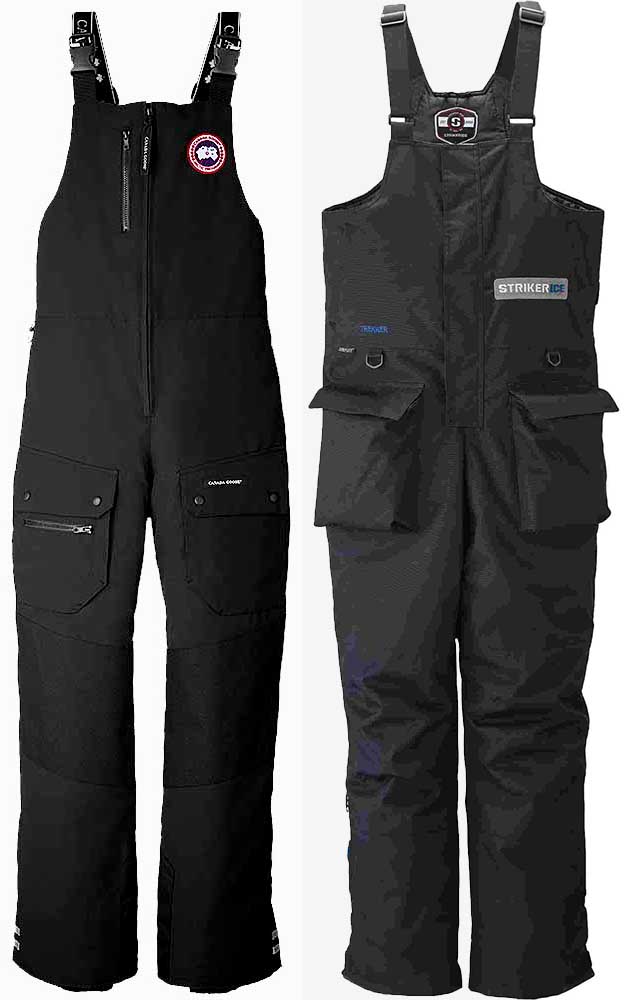
One costs $700 more than the other, but both work
For my outer layer I really like a bib/braces combo. The braces will keep everything underneath in place and "where it should be" without multiple restrictive belts and ties. Trust me, you don't want to be wrestling with belts and such if you need to pee in -50.
Get snow pants that have a gaiter-like cuff at the bottom to fit snugly around your boots. That will keep snow out if you have to trudge through deep snow.
Side zips are also, in my opinion, a must to allow you to take them off while leaving your boots on or, after a strenuous hike, open up to allow moisture out.
Some pockets are always handy to hold non-electronic stuff, such as a compass, tissues, lens cleaning kit or combo knife. Adjustable braces on the bib will make it all much more comfortable. The bib will also add an extra layer of insulation to your upper body without adding bulk to your arms (which can get restricted with too many layers).
If you're crawling about on hard ice or kneeling a lot, add on some knee pads. You can pick up very cheap pads with elastic velcro straps at your local hardware store. They're very light, pack down to a reasonable size and are easy to put on and take off.
Upper Body
We already mentioned the thermal underwear layer. Thermals are usually sold together as a top and bottom pair. Get something that's comfortable and fits snugly, not too tight or too loose. Avoid metal zips. Thumb loops are good for pulling on layers over the top but it's not vital.
Over your thermal top, put on your second layer. I have a cheap, thick polyester jacket style top without a hood. It has great insulation properties and isn't too heavy. It has a zippered internal pocket into which I place my spare batteries and memory cards. That keeps them nice and close to the heat furnace. The inside of your outer layer can be surprisingly cold, so I like to keep the batteries close to my body.
Mine has a full frontal zip. In spring when things start to warm up I can unzip to allow heat and moisture out, but that's not vital. It's more important to be warmer in extreme cold so opt for no zip if you wish.
My next layer is a down jacket without a hood. It's a polyester material on the outside filled with down. That makes other layers easier to slip over it and also easier to slide over my second polyester layer.
In warmer temps I can take it off and roll it up into a very small package to store in my crowded backpack. In extreme cold, it offers superb insulation.
Over the top of that I wear my hoodie or hooded sweatshirt. It's your normal style and worn more for camouflage than warmth. It also has good storage with the front pouch to temporarily hold gloves, mitts, hats or goggles. It's not fancy or waterproof, but then water isn't an issue in -30C. Snow just falls off.
You can swap this out with another polyester layer, such as a sleeveless vest to allow free arm movement while increaseing core warmth.
My final layer is a serious down filled parka style jacket with wrist cuffs to keep out the wind, heavy duty two way zip with velcro wind flap and large deep hood to cover all your hats and hold a pocket of air in front of your face.
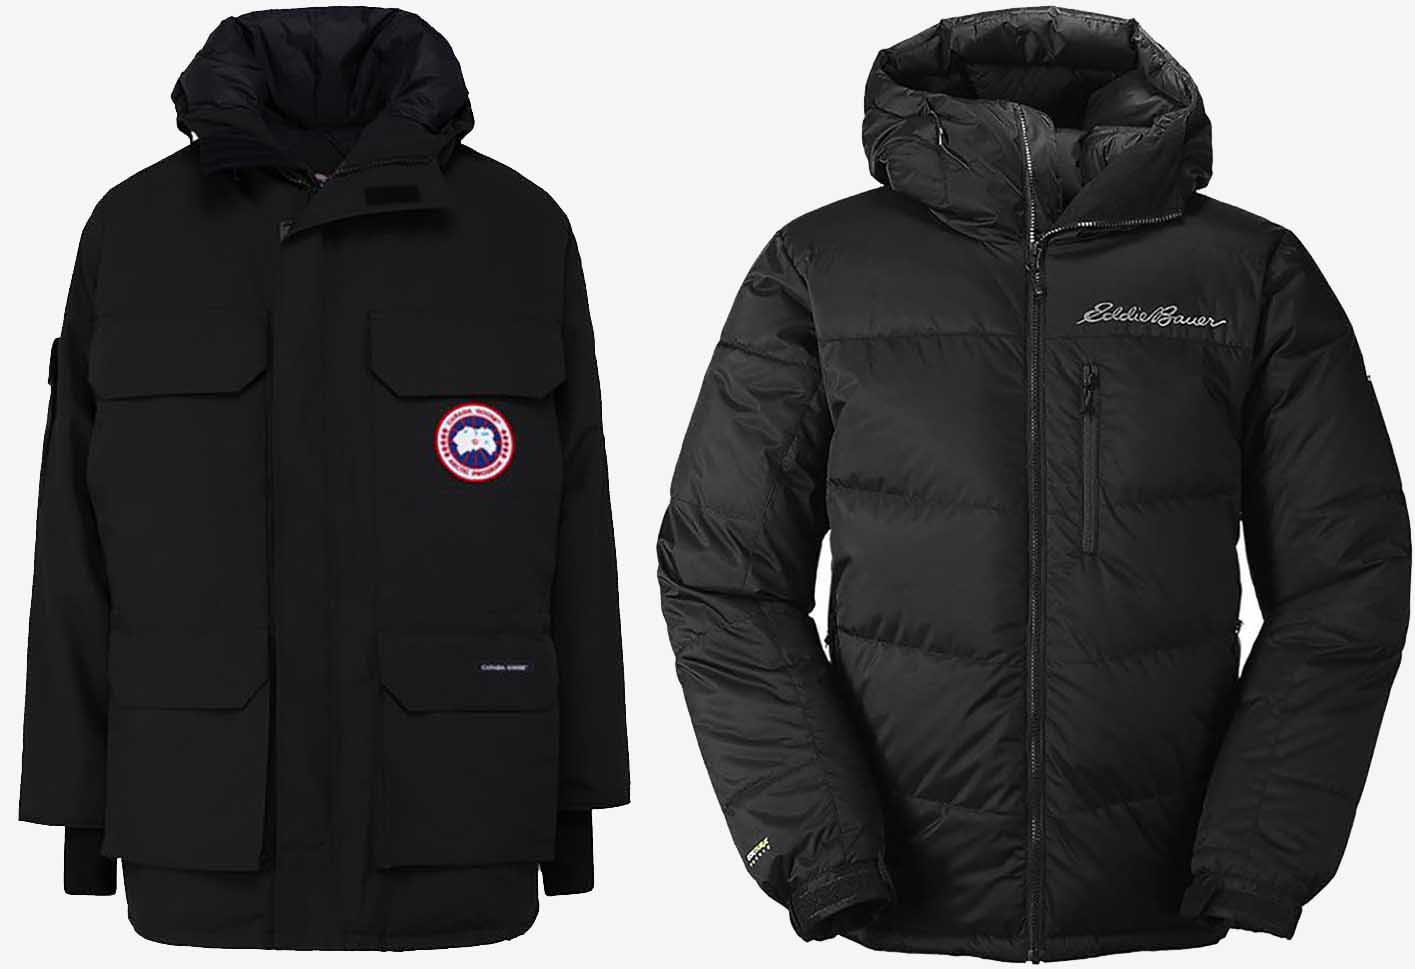
Not for mall shopping, these are parkas for killer cold
The hood has a wire inside to form the circular opening properly. The zip goes all the way up forming a high, protective neck seal to keep the wind out.
When buying the jacket, make sure you get one that will cover your arms all the way to the wrist, below your belt line to cover your butt and big enough to cover ALL of your layers without restricting you.
As a rule of thumb, get a jacket that's one size bigger than you would normally buy. Some jacket manufacturers build in allowance for layers, so read the fine print. It's a VERY important part of your "armour" against the cold, so don't skimp. Expect to pay between $1000-$2000 for a serious parka.
Like your snow pants, the outer layer jacket should be reasonably robust to allow for crawling around on ice and brushing through sharp, nasty brush.
To keep this in perspective, remember that we're talking about parkas for wildlife photographers who sit for long periods of time in extreme cold. The ones shown are not recommended for other activites such as mountain climbing. They're just too heavy for that, with much lighter specialist jackets made for that purpose. The reason I don't recommended those lighter parkas is that they're too fragile for all the thrashing about among trees that we do. They also tend be be brightly coloured, which isn't a good look for us.
Some deep outer pockets are important as well as internal pockets including an oversize pocket for storing mitts or similar bulky clothing that you need to temporarily ditch.
If you're going to be out in extreme cold for multiple days, don't be afraid to throw in an extra polyester jacket, a spare set of gloves and an extra hat. You don't know if you are going to lose some of your layers (yes, it's happened to me) or you may need an extra layer to help a struggling core temperature. It's better to have it and not use it than need it and not have it, right?
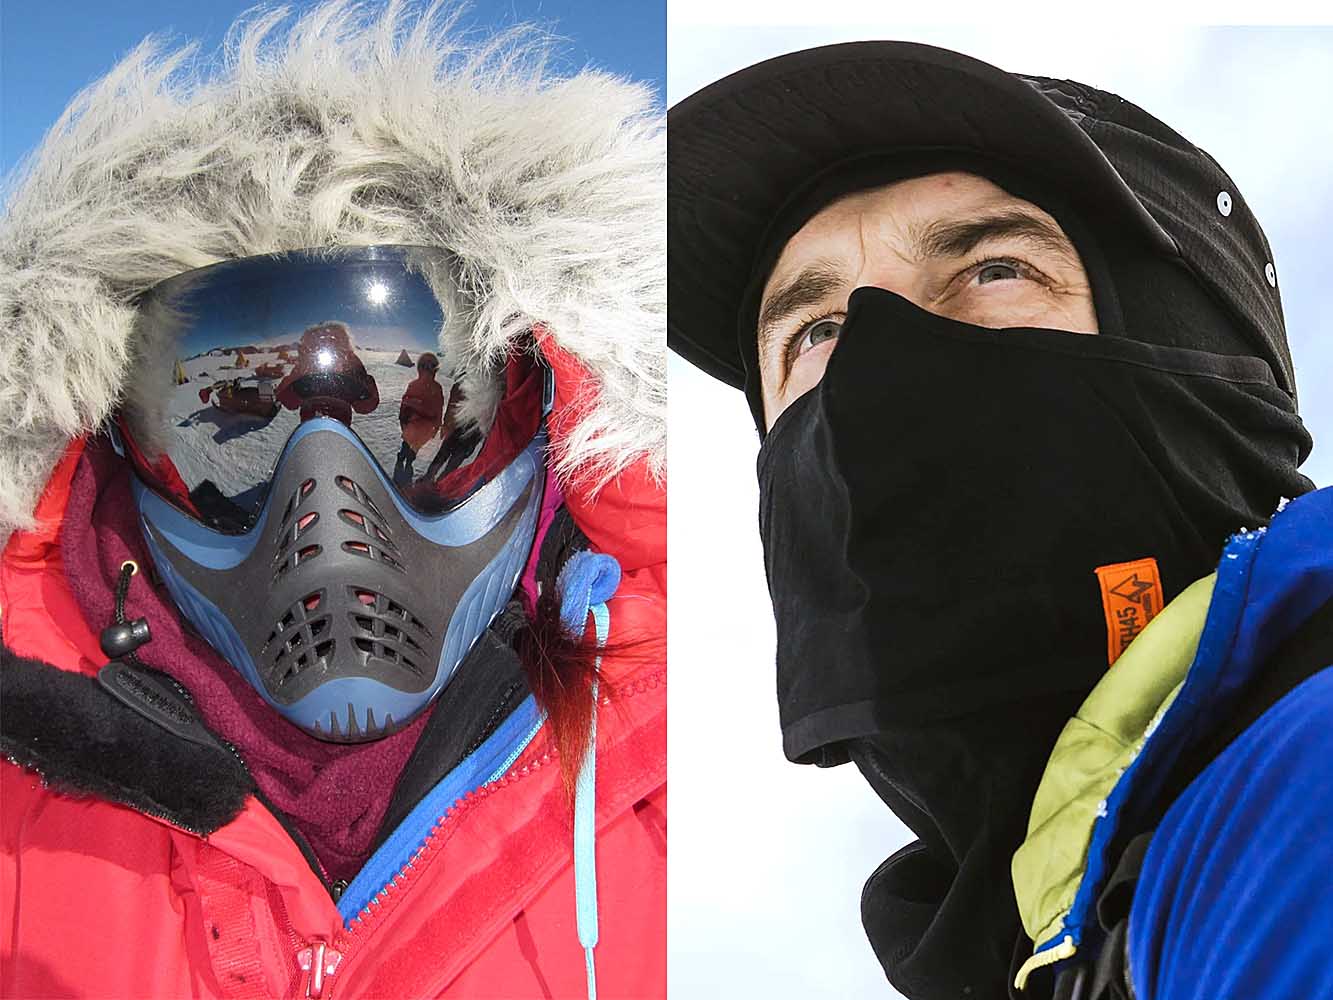
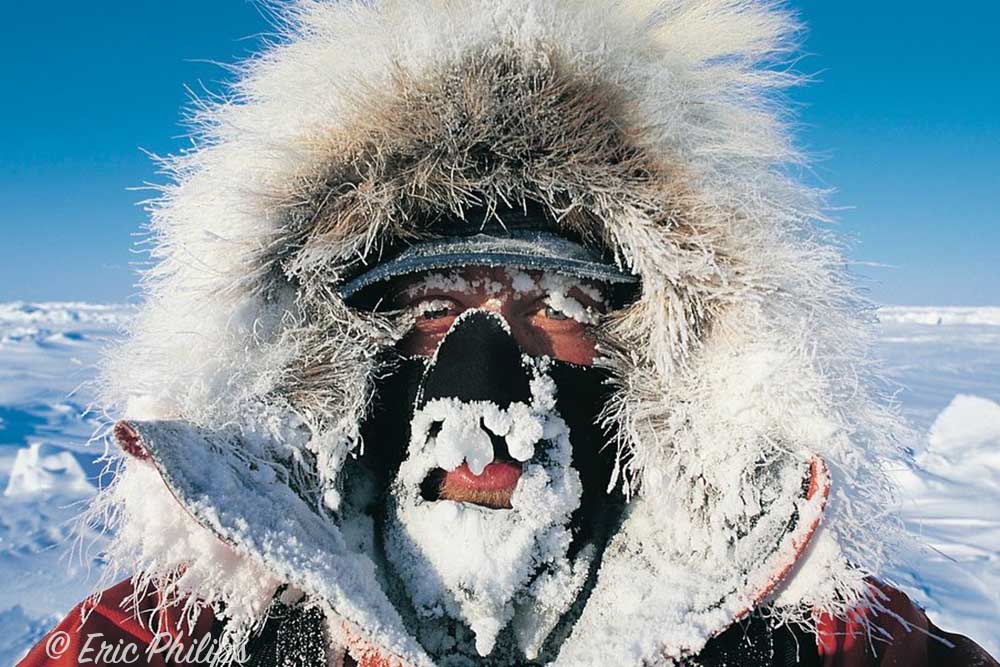
Head and Face
On top we need some serious insulation. I often use a balaclava as a base layer, especially if it's windy or if I'm moving in a sled or on a snowmobile. Freezing your face is a real danger. You can damage your eyes, lose your nose, lips and/or cheeks from frostbite in just a few minutes. It's no joke. If you're showing bare skin in extreme cold, make sure it's skin you can afford to lose. I'm serious here. In -50 or -60 you can lose a finger or nose tip with just 1 minute's exposure.
If you wear glasses or snow goggles, you need to have a vent to allow breath to exit below and out from your nose and mouth. It will also help protect your camera's viewfinder and binoculars from fogging up with your steamy breath as the wolverine walks towards you. So I would suggest that everyone has a vented balaclava or something similar to avoid fogging.
There are balaclavas designed for such situations. You can also make your own "face guard". There are also face guards made by goggle manufacturers that clip onto the goggles to allow for venting without fogging them up or face protection made from various materials, such as neoprene rubber or hard plastic.
There are a few devices intended to manage icy breath and condensation, but they're more trouble than they're worth and are no substitute for managing your breath with directional flow.
Hard plastic and cloth options, the latter designed to vent breath down and out
You can also buy heated goggles, often used by snowmobilers, but they tend to be finicky and the wires usually snap in -40.
In any event, you need face protection with either a vented balaclava and/or face mask. You can get them in marino wool but, as mentioned above, polyester is more than adequate.
On top of that you should have a snug, relatively thin beanie/touque/hat. It should fit closely to your head and be able to cover at least the tops of your ears. You want something that isn't too bulky but rather more fitted. Wool is best but wool/poly blends are also fine as is Thinsulate.
Over the top of that is your second hat. Yes, two. It should be looser and a size larger and be able to be pulled down at the back over your neck (at least in part) and completely over your ears. I have one that's a double layer of thinsulate, but you get whatever fits right. It needs to be slightly larger than what you would usually buy to cover the bottom two layers without straining or putting pressure on your head to avoid it creeping up and uncovering your ears.
Your neck needs extra protection so a wool buff works well. Just make sure it's not too bulky to enable your outer jacket to be fully zipped up.
As mentioned above, snow goggles or glacier glasses (sunglasses with side panels to avoid snow glare) should be used, particularly on sunny days. You're protecting your eyeballs from freezing, but also protecting your retinas from snow blindness. A sunny day out on the sea ice will burn your eyes blind very quickly. So get lenses with UV protection. Polarization helps too.
If you're particularly prone to fogging, buy googles that have removable lenses. Buy at least one (2 or 3 is better) backup lenses and keep them in a plastic bag inside your coat. The bag will prevent body sweat from sticking to the lens, turning to ice when you bring it out.
For lenses that are fogged with a layer of ice, place them in a plastic ziplock style bag with a couple of hand warmers and some packets of moisture absorbing silica gel. Put the whole shebang inside as many layers as possible to allow body heat to melt the ice and have the gel absorb the moisture. Rotate as necessary to keep your vision clear.
If you're travelling and stop for a bit, don't put your goggles up on top of your head. It's tempting but that will have them fog up quick smart as body heat, combined with moisture from your sweat, rises up off your head. Take them off completely or pull them down around your neck and swing them around, away from your nose and mouth.
Your Walmart balaclava won't work here
In summation, keep your hat on. If you feel cold, add another hat. Protect your nose and ears from frostbite by keeping them covered. Avoid sunburn and windburn, mostly a problem on your face. You need your eyes healthy and in working order to take photos so avoid snow blindness with googles or glacier glasses. Oh, and freezing your eyeballs really is a thing. Protect your eyes from wind.
No matter what you use for face protection, you'll have ongoing issues. No one has really solved the face protection issue. Eyeglass weareres are particularly disadvantaged. Staying fog free when both travelling and shooting while sitting still is a constant battle.
Also, be careful that your nose doesn't stick to the back of your camera. It does happen.
Don't breath on your viewfinder, LCD screen, front lens element or your binocular eyepieces. You know what's gonna happen and it's difficult to undo that in -40.
Hands and fingers
There's a huge market for gloves and mitts out there. Most are unsuitable for photographers. Most are overpriced. Most are not made for extreme cold.
Like the rest of your body, you should have a thermal base layer. The best solution for that are what's called glove liners. They are thin, form fitting gloves that, by themselves, are suitable only for much warmer weather (mebbe -5 to +10C). But in combination with other layers, they provide frostbite protection while allowing enough dexterity to feel your camera & lens controls.
While touch sensitive glove liners are popular, and you should get them, your LCD screens won't work in extreme cold, no matter how hard you press. You might get them to work now and then, but certainly not consistantly and never when you really need them. You'll get a lot of use out of the touch functionality in warmer weather, so, sure, get liners with touch pads, as there's no point buying multiple pairs.
Buy a pair that are not wafer thin, you need some protection, balanced with dexterity. Here is where you can save a lot of money. You can pay $60-100 dollars for popular brand name liner gloves, such as Vallerett and Heat Company. You don't need that. You can get a good, comfortable pair from Walmart, Target, Costco, etc at a fraction of the price.
This is your base layer and also the layer that will be in contact with your camera, lens and general surroundings all day, so you will wear them out. They will get holes, burn and melt when you pick up a hot pot, tear and generally fall apart from constant use. So a cheap pair will work just as well as a pair that are 5-10x the price.
Remember, they aren't supposed to "keep you warm". Your gloves and mitts have that job. They're there to allow you to temporarily use your fingers and thumb with dexterity in extreme cold while uncovered by your outer layers.
Over your liner gloves should be your main gloves. They should be "photography gloves" with a flip back tip on your index finger and thumb on both hands. That will allow you to feel and operate buttons and switches on your camera and lens by your index finger and thumb which are covered by the liner gloves.
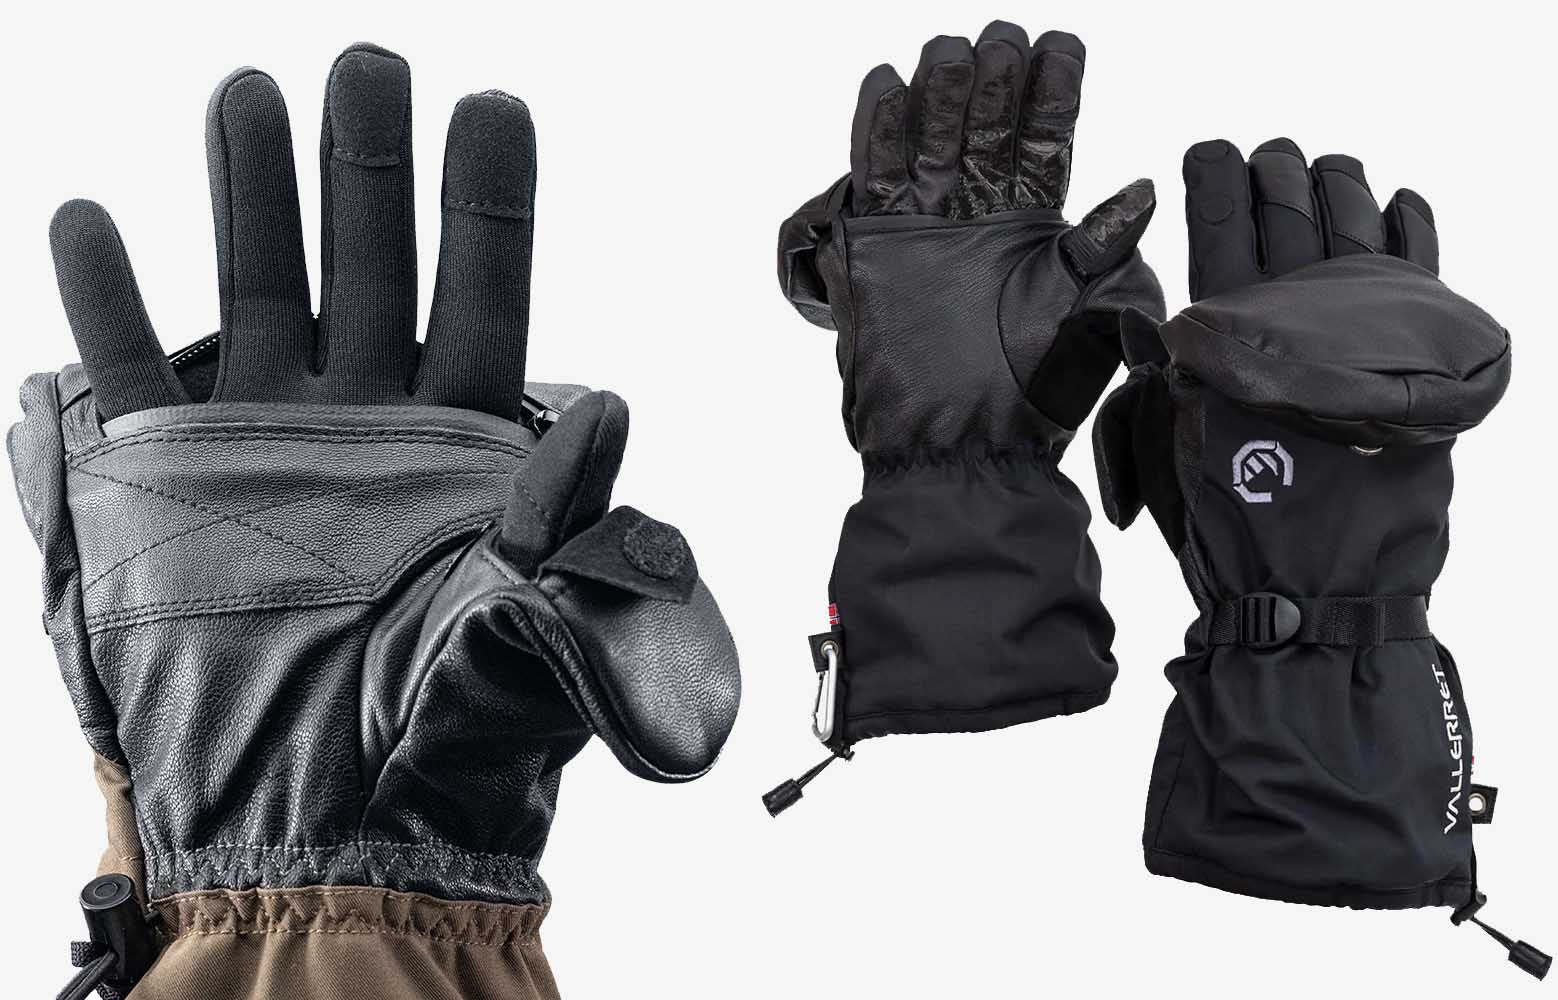
Mitt but just liner glove. Mitt with glove and liner glove - much warmer
NOTE: Avoid, if at all possible, placing your mitts and/or gloves directly on snow or ice. Even after you take them off, a warm pocket of air is held inside. Dropping them onto the snow will quickly convert that comparitivlely warm air into a fridgid pool into which you will soon be thrusting your delicate pinkies. Put them into your coat pockets, place them on your backpack, balance them on a tree branch. Just keep them off the ground.
Tactile feedback will not be as good as bare hands, but then the liner gloves allow you to avoid frost bite and finger amputation in the long run. So, worth the slight drop in tactile feedback, right?
Over the top of your photography gloves comes your outer layer which should be mitts.
Mitts should be thick, well insulated, windproof and long enough to cover your jacket cuff and a decent part of your forearms. Being waterproof or water resistant is OK, but in the real world, you don't need that. You're in extreme cold. There is no rain. They will be water resistant enough to handle light rain or melting snow/ice, but if the weather is that warm you're not going to need them unless you're zipping along on a snowmobile with the associated wind chill.
They should be loose enough to allow you to slip your liner and glove encased hands without struggle. They should also be big enough to allow hand warmers to be placed inside the mitt where your fingertips will be sitting.
While disposable hand warmers are quite small and thin, in extreme cold you will need to use a minimum of two or, as I do, 4-6 hand warmers. So you do need a decent air pocket available.
Also, I love rechargeable electric hand warmers. They pump out a lot of heat in a short period of time (much more than the chemical type) and will, in extreme circumstances, save your fingers from frostbite and amputation, not to mention allowing you to shoot in relative comfort and not painful misery.
Their downside is that they are bulkier than chemical pouches, plus they will need recharging through the day. So if you do use that option, make sure you have enough room in the mitt to hold them and carry a powerpack and cable to recharge on the run.
There are two types of mitt design for photographers: four finger mitts and trigger mitts. Four finger mitts have a pouch that takes all four fingers plus another small pouch for the thumb. Trigger mitts have a pouch for 3 fingers, a separate pouch for the index finger and another pouch for the thumb.
As the name implies, trigger mitts were designed for using a rifle in cold weather. They work OK and tend to be more supple, thinner and, hence, dexterous than the standard mitts. But standard mitts are warmer as they are thicker and more insulated, not having to be flexible enough to handle a rifle with a touchy trigger. Also, the index finger is kept snuggled in with the other fingers, adding a little warmth to the setup, like a colony of penguins huddling together against a storm.
I have a YouTube video regarding mitts and gloves which covers this in detail, but the bottom line is that my preferred setup (at the moment) is the Vallerett system. They take any brand of liner gloves (I don't buy their's, as noted above), the gloves have flip back index and thumb tips with magnets to keep them open, thick large warm mitts with a zip in the palm to allow one or more fingers to poke out and a flip back thumb.
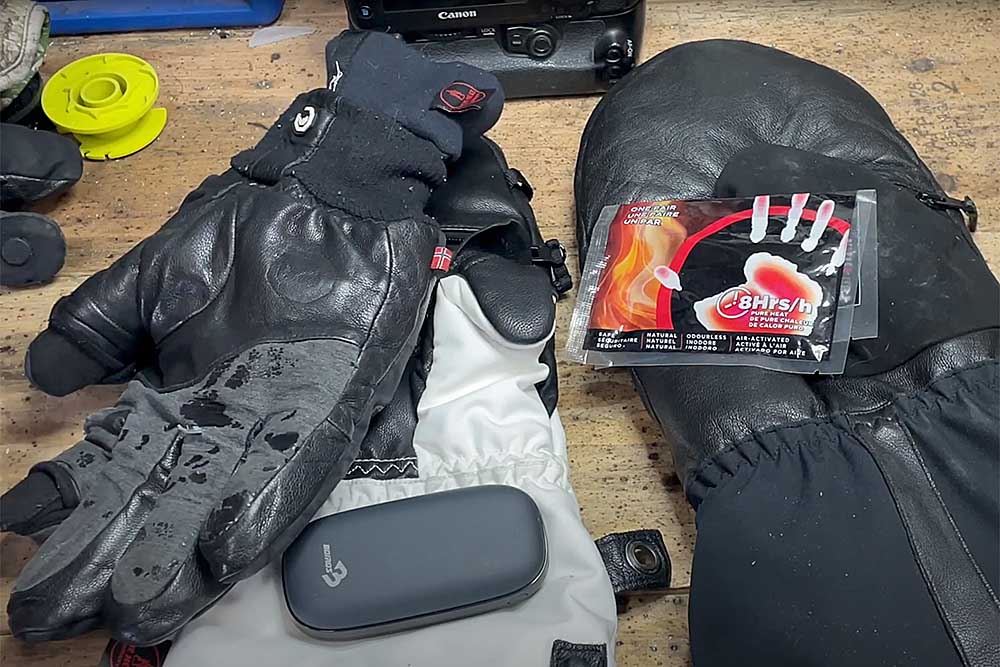
I can be in a howling storm on the Antarctic ice shelf and still get my index and thumb tips out, covered by the liner glove material, to manipulate my camera and lens. When the tips get cold, which they will, and feeling starts to ebb, I can cover them and get them back into the mitt with the hand warmers ready to revive them.
If it's too cold for a finger tip to poke out (such as when you've been shooting for a few hours) then you can still operate the camera, albeit a bit slower and less precise, with the fold-back glove fingertips flipped back over the tip.
The Heat Company system is more suited to cold weather, not extreme cold. The mitts are thinner and only allow for a liner glove. In fact, they refer to the mitt as a "glove", which it's not. It's a standard mitt with 4 fingers together and a separate thumb.
When it's -40 and blowing, having your index finger only protected by a liner glove is a recipe for disaster, and frost bite. In fact, according to their marketing material, it's assumed that you have all four fingers out, only protected by one of their very expensive liner gloves. That's just fine if it's -10 but you won't last long when you're photographing polar bear cubs emerging in -60C with wind chill.
Regarding polar bears: “We spent several days in -45°C with one day getting as cold as -56" George Williams
I realize that glove selection is, like any clothing, a personal choice. But be warned, if you want to take photos in extreme cold, you better be prepared to keep your hands safe.
Oh, and often you will see some marketing promoting a small zippered pouch on the back of the hand to, "hold a memory card or hand warmer".
There's no way I'm going to have a $300 memory card in my glove, one of the most lost pieces of clothing ever invented. Also, a hand warmer placed there is going to have zero effect on keeping your fingers warm compared to a warmer pack held in your fingers, no more than a heat pack at the back of your head is going to keep your nose warm.
Bottom line with gloves: use photography gloves and mitts with a liner glove. Never allow bare hands or fingers to be out in extreme cold, even for a minute. You won't feel frost bite until it's way too late. In fact, you won't feel anything until you warm them up because your flesh and nerves are frozen. When the flesh warms up again, the pain is real, intense and constant as your finger tips turn black, the flesh dies and, later, begins to rot.
Out and About
Besides clothing, there are a couple of other things you can do to help stay warm, or at least endure the cold while the wolves come towards you.
A foam seat pad is a light, handy accessory that I use all the time. It adds extra padding to any seat, whether that be a folding chair or lump of ice. It insulates your butt from the ice or your feet when placed as a mat on the snow. Mine is a two piece pad, like a hinged chair seat and back, which, in a pinch, can be opened out and laid flat to lie on if you need to get down to ground level, something that wildlife photographers love to do.
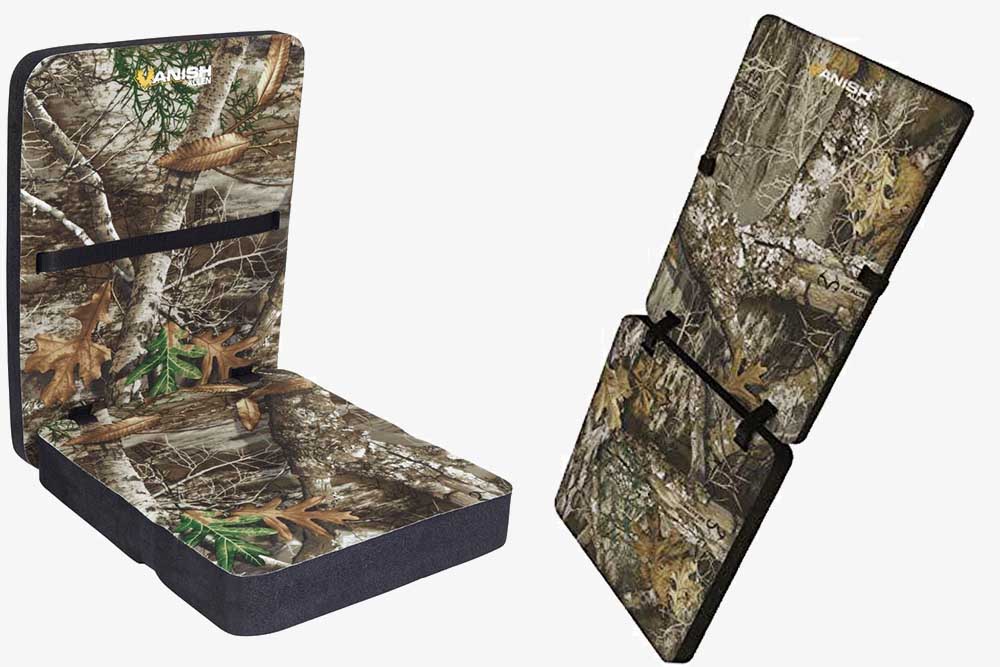
Multi use folding chair pad. Also available in single pad and/or extra thick.
A small chair or stool will also keep you off the ice with the addition of the aforesaid rubber pad adding a little more comfort and insulation from the surrounding air. Sure, you can stand or sit on the snow/ice, but after an hour (or less) you are going to be begging for a seat and I doubt that you would last an 8 hour stretch.
There are ultralight camping seats you can buy, but they aren't cheap. I have a $10 camping chair that I bought from Walmart that's fairly light and compact. Luxury. Perfect for those long days waiting for a wolverine to appear.
Add a well insulated thermos for hot soup or drinks. I have a smallish one that fits easily inside my coat to help keep it warm. When the wind's biting, the cold seeping in and no sight yet of your subject, a hot drink will keep you going. It will also keep you hydrated, which will help keep you warm.
Bottom Line
If you've never been in extreme cold before, or tried taking photos in such an environment, the reality is a real slap in the face. It can be fun and enjoyable, or you can be miserable, or you can be dead. It all depends on your preperation. Treat extreme cold with respect. Try day trips first, if you can, and/or follow your guide/outfitter's clothing suggestions to the letter.
It'll be worth all the effort when you print up your frosty bison, pacing polar bear or wind swept wolf with your nose, eyes, fingers and toes all intact.
Compared to your lounge room, it's a lot different out here when the wind starts to blow